Spring Batch 集成
Spring Batch 集成
Spring Batch Integration 简介
许多 Spring Batch 用户可能会遇到以下需求: 超出 Spring Batch 的范围,但这可能是有效的和 使用 Spring Integration 简洁地实现。相反,Spring 集成用户可能会遇到 Spring Batch 需求,需要一种方法 有效地集成这两个框架。在这种情况下,几个 模式和用例出现,Spring Batch Integration 满足这些要求。
Spring Batch 和 Spring Integration 之间的界限并不总是如此 很清楚,但有两条建议可以 帮助:考虑粒度,并应用常见模式。一些 本参考手册中描述了这些常见模式 部分。
将消息传递添加到批处理过程可以实现自动化 运营以及关键问题的分离和战略制定。 例如,一条消息可能会触发要执行的作业,然后 消息的发送可以通过多种方式公开。或者,当 作业完成或失败,则该事件可能会触发要发送的消息, 这些消息的使用者可能会有作问题 与应用程序本身无关。消息传递可以 还嵌入到作业中(例如,读取或写入 通过通道处理)。远程分区和远程分块 提供在多个辅助角色上分配工作负载的方法。
本节介绍以下关键概念:
命名空间支持
从 Spring Batch Integration 1.3 开始,专用的 XML 命名空间 添加了支持,旨在提供更简单的配置 经验。要激活命名空间,请添加以下内容 命名空间声明到您的 Spring XML 应用程序上下文 文件:
<beans xmlns="http://www.springframework.org/schema/beans"
  xmlns:xsi="http://www.w3.org/2001/XMLSchema-instance"
  xmlns:batch-int="http://www.springframework.org/schema/batch-integration"
  xsi:schemaLocation="
    http://www.springframework.org/schema/batch-integration
    https://www.springframework.org/schema/batch-integration/spring-batch-integration.xsd">

    ...

</beans>
用于 Spring 的完全配置的 Spring XML 应用程序上下文文件 批量集成可能如下所示:
<beans xmlns="http://www.springframework.org/schema/beans"
  xmlns:xsi="http://www.w3.org/2001/XMLSchema-instance"
  xmlns:int="http://www.springframework.org/schema/integration"
  xmlns:batch="http://www.springframework.org/schema/batch"
  xmlns:batch-int="http://www.springframework.org/schema/batch-integration"
  xsi:schemaLocation="
    http://www.springframework.org/schema/batch-integration
    https://www.springframework.org/schema/batch-integration/spring-batch-integration.xsd
    http://www.springframework.org/schema/batch
    https://www.springframework.org/schema/batch/spring-batch.xsd
    http://www.springframework.org/schema/beans
    https://www.springframework.org/schema/beans/spring-beans.xsd
    http://www.springframework.org/schema/integration
    https://www.springframework.org/schema/integration/spring-integration.xsd">

    ...

</beans>
将版本号附加到引用的 XSD 文件也是 allowed,但是,由于无版本声明始终使用 latest schema,我们通常不建议附加版本 number 添加到 XSD 名称。添加版本号 更新 Spring Batch 时可能会产生问题 集成依赖项,因为它们可能需要更新版本 XML 模式的。
通过消息启动批处理作业
使用核心 Spring Batch API 启动批处理作业时,您可以 基本上有2个选项:
-
在命令行中,使用
CommandLineJobRunner -
以编程方式,使用
JobOperator.start()或JobLauncher.run()
例如,您可能希望使用CommandLineJobRunner调用批处理作业时
使用 shell 脚本。或者,您可以使用JobOperator直接(例如,当使用
Spring Batch 作为 Web 应用程序的一部分)。但是,呢
更复杂的用例?也许您需要轮询远程 (S)FTP
服务器来检索批处理作业或应用程序的数据
必须同时支持多个不同的数据源。为
例如,您不仅可能从 Web 接收数据文件,还可以从
FTP 和其他来源。也许输入文件的额外转换是
在调用 Spring Batch 之前需要。
因此,执行批处理作业会更强大
使用 Spring Integration 及其众多适配器。例如
您可以使用文件入站通道适配器来
监控文件系统中的目录并启动批处理作业
输入文件到达后立即。此外,您可以创建 Spring
使用多个不同适配器的集成流轻松
从多个源摄取批处理作业的数据
同时仅使用配置。实现所有这些
使用 Spring Integration 的场景很容易,因为它允许
解耦的、事件驱动的执行JobLauncher.
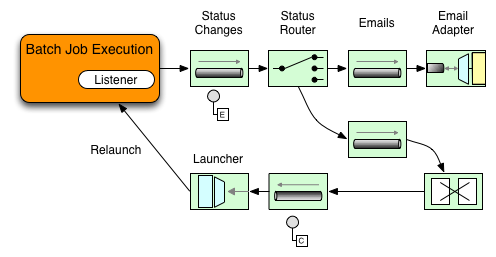
Spring Batch Integration 提供了JobLaunchingMessageHandler类,您可以用于启动批处理作业。的输入JobLaunchingMessageHandler由Spring Integration 消息提供,其有效负载类型为JobLaunchRequest. 此类是Job需要启动的,围绕JobParameters启动批处理作业所必需的。
下图说明了典型的 Spring Integration消息流,以便启动 Batch 作业。EIP(企业集成模式)网站提供了消息传递图标及其描述的完整概述。

将文件转换为 JobLaunchRequest
package io.spring.sbi;
public class FileMessageToJobRequest {
private Job job;
private String fileParameterName;
public void setFileParameterName(String fileParameterName) {
this.fileParameterName = fileParameterName;
}
public void setJob(Job job) {
this.job = job;
}
@Transformer
public JobLaunchRequest toRequest(Message<File> message) {
JobParametersBuilder jobParametersBuilder =
new JobParametersBuilder();
jobParametersBuilder.addString(fileParameterName,
message.getPayload().getAbsolutePath());
return new JobLaunchRequest(job, jobParametersBuilder.toJobParameters());
}
}
这JobExecution响应
执行批处理作业时,JobExecutioninstance 被返回。 这 实例可用于确定执行状态。 如果 一个JobExecution能够创建成功时,它总是被返回,无论实际执行是否成功。
关于如何JobExecution实例是否返回取决于提供的TaskExecutor. 如果synchronous(单线程)TaskExecutor实现,则JobExecution仅返回响应after作业完成。使用asynchronous
TaskExecutor这JobExecutioninstance 被返回 马上。 然后,用户可以将id之JobExecution实例 (与JobExecution.getJobId()) 并查询JobRepository对于作业的更新状态使用JobExplorer. 有关更多信息信息,请参阅 SpringBatch 参考文档 关于查询存储库。
Spring Batch 集成配置
考虑某人需要创建文件的情况inbound-channel-adapter监听对于提供目录中的 CSV 文件,请将它们移交给转换器 (FileMessageToJobRequest),通过作业启动网关启动作业,然后记录JobExecution使用logging-channel-adapter.
以下示例显示了如何在 XML 中配置该常见情况:
<int:channel id="inboundFileChannel"/>
<int:channel id="outboundJobRequestChannel"/>
<int:channel id="jobLaunchReplyChannel"/>

<int-file:inbound-channel-adapter id="filePoller"
    channel="inboundFileChannel"
    directory="file:/tmp/myfiles/"
    filename-pattern="*.csv">
  <int:poller fixed-rate="1000"/>
</int-file:inbound-channel-adapter>

<int:transformer input-channel="inboundFileChannel"
    output-channel="outboundJobRequestChannel">
  <bean class="io.spring.sbi.FileMessageToJobRequest">
    <property name="job" ref="personJob"/>
    <property name="fileParameterName" value="input.file.name"/>
  </bean>
</int:transformer>

<batch-int:job-launching-gateway request-channel="outboundJobRequestChannel"
    reply-channel="jobLaunchReplyChannel"/>

<int:logging-channel-adapter channel="jobLaunchReplyChannel"/>
以下示例显示了如何在 Java 中配置该常见情况:
@Bean
public FileMessageToJobRequest fileMessageToJobRequest() {
    FileMessageToJobRequest fileMessageToJobRequest = new FileMessageToJobRequest();
    fileMessageToJobRequest.setFileParameterName("input.file.name");
    fileMessageToJobRequest.setJob(personJob());
    return fileMessageToJobRequest;
}

@Bean
public JobLaunchingGateway jobLaunchingGateway() {
    SimpleJobLauncher simpleJobLauncher = new SimpleJobLauncher();
    simpleJobLauncher.setJobRepository(jobRepository);
    simpleJobLauncher.setTaskExecutor(new SyncTaskExecutor());
    JobLaunchingGateway jobLaunchingGateway = new JobLaunchingGateway(simpleJobLauncher);

    return jobLaunchingGateway;
}

@Bean
public IntegrationFlow integrationFlow(JobLaunchingGateway jobLaunchingGateway) {
    return IntegrationFlows.from(Files.inboundAdapter(new File("/tmp/myfiles")).
                    filter(new SimplePatternFileListFilter("*.csv")),
            c -> c.poller(Pollers.fixedRate(1000).maxMessagesPerPoll(1))).
            transform(fileMessageToJobRequest()).
            handle(jobLaunchingGateway).
            log(LoggingHandler.Level.WARN, "headers.id + ': ' + payload").
            get();
}
示例 ItemReader 配置
现在我们正在轮询文件并启动作业,我们需要配置我们的 Spring 批ItemReader(例如)使用在作业定义的位置找到的文件名为“input.file.name”的参数,如以下 Bean 配置所示:
以下 XML 示例显示了必要的 bean 配置:
<bean id="itemReader" class="org.springframework.batch.item.file.FlatFileItemReader"
    scope="step">
  <property name="resource" value="file://#{jobParameters['input.file.name']}"/>
    ...
</bean>
以下 Java 示例显示了必要的 bean 配置:
@Bean
@StepScope
public ItemReader sampleReader(@Value("#{jobParameters[input.file.name]}") String resource) {
...
    FlatFileItemReader flatFileItemReader = new FlatFileItemReader();
    flatFileItemReader.setResource(new FileSystemResource(resource));
...
    return flatFileItemReader;
}
前面示例中的主要兴趣点是注入#{jobParameters['input.file.name']}作为 Resource 属性值,并将ItemReader豆 以具有 Step 作用域。将 Bean 设置为具有 Step 作用域利用了后期绑定支持,它允许访问jobParameters变量。
作业启动网关的可用属性
作业启动网关具有以下属性,您可以设置这些属性来控制作业:
-
id:标识底层 Spring bean 定义,它是以下任一实例:-
EventDrivenConsumer -
PollingConsumer(确切的实现取决于组件的输入通道是否是SubscribableChannel或PollableChannel.)
-
-
auto-startup:布尔标志,指示端点应自动启动 启动。默认值为 true。 -
request-channel:输入MessageChannel此端点的。 -
reply-channel:MessageChannel生成的JobExecution有效负载已发送。 -
reply-timeout:用于指定此网关等待回复消息的时间(以毫秒为单位) 在抛出之前成功发送到回复通道 异常。此属性仅适用于通道 可能会阻塞(例如,当使用有界队列通道时 目前已满)。另外,请记住,当发送到DirectChannel时,调用发生 在发件人的线程中。因此,发送失败 作可能是由下游的其他组件引起的。 这reply-timeout属性映射到sendTimeout基础的属性MessagingTemplate实例。如果未指定,则属性 默认为<emphasis>-1</emphasis>, 这意味着,默认情况下,Gateway无限期等待。 -
job-launcher:自选。接受 习惯JobLauncherbean 引用。 如果未指定适配器 重用在id之jobLauncher.如果没有默认实例 存在,则抛出异常。 -
order:指定此端点作为订阅者连接时的调用顺序 设置为SubscribableChannel.
子元素
当这个Gateway正在接收来自PollableChannel,您必须提供
全局默认值Poller或提供Poller子元素添加到Job Launching Gateway.
以下示例显示了如何在 XML 中提供轮询器:
<batch-int:job-launching-gateway request-channel="queueChannel"
    reply-channel="replyChannel" job-launcher="jobLauncher">
  <int:poller fixed-rate="1000">
</batch-int:job-launching-gateway>
以下示例显示了如何在 Java 中提供轮询器:
@Bean
@ServiceActivator(inputChannel = "queueChannel", poller = @Poller(fixedRate="1000"))
public JobLaunchingGateway sampleJobLaunchingGateway() {
    JobLaunchingGateway jobLaunchingGateway = new JobLaunchingGateway(jobLauncher());
    jobLaunchingGateway.setOutputChannel(replyChannel());
    return jobLaunchingGateway;
}
通过信息性消息提供反馈
由于 Spring Batch 作业可以运行很长时间,从而提供进度 信息往往至关重要。例如,利益相关者可能希望 如果批处理作业的部分或全部部分失败,则收到通知。 Spring Batch 为正在收集的信息提供支持 通过:
-
主动轮询
-
事件驱动的侦听器
异步启动 Spring Batch 作业时(例如,使用Job Launching
Gateway)、一个JobExecutioninstance 返回。因此JobExecution.getJobId()可以
用于通过检索JobExecution从JobRepository通过使用JobExplorer.然而,这是
被认为是次优的,应该首选事件驱动的方法。
因此,Spring Batch 提供了监听器,包括最常用的三个 听众:
-
StepListener -
ChunkListener -
JobExecutionListener
在下图所示的示例中,Spring Batch 作业已配置了StepExecutionListener.因此,Spring Integration 接收并处理之前的任何步骤
或事件发生后。例如,收到的StepExecution可以使用Router.根据该检查的结果,可能会发生各种情况(例如
将邮件路由到邮件出站通道适配器),以便电子邮件通知可以
根据某种条件发出。
以下由两部分组成的示例显示了如何配置侦听器以发送
消息发送给Gateway对于一个StepExecution事件并将其输出记录到logging-channel-adapter.
首先,创建通知集成 Bean。
以下示例显示了如何在 XML 中创建通知集成 Bean:
<int:channel id="stepExecutionsChannel"/>

<int:gateway id="notificationExecutionsListener"
    service-interface="org.springframework.batch.core.StepExecutionListener"
    default-request-channel="stepExecutionsChannel"/>

<int:logging-channel-adapter channel="stepExecutionsChannel"/>
以下示例显示了如何在 Java 中创建通知集成 Bean:
@Bean
@ServiceActivator(inputChannel = "stepExecutionsChannel")
public LoggingHandler loggingHandler() {
    LoggingHandler adapter = new LoggingHandler(LoggingHandler.Level.WARN);
    adapter.setLoggerName("TEST_LOGGER");
    adapter.setLogExpressionString("headers.id + ': ' + payload");
    return adapter;
}

@MessagingGateway(name = "notificationExecutionsListener", defaultRequestChannel = "stepExecutionsChannel")
public interface NotificationExecutionListener extends StepExecutionListener {}
您需要添加@IntegrationComponentScan注释添加到您的配置中。 |
其次,修改作业以添加步进级侦听器。
以下示例显示了如何在 XML 中添加步进级侦听器:
<job id="importPayments">
    <step id="step1">
        <tasklet ../>
            <chunk ../>
            <listeners>
                <listener ref="notificationExecutionsListener"/>
            </listeners>
        </tasklet>
        ...
    </step>
</job>
以下示例显示了如何在 Java 中添加步进级侦听器:
public Job importPaymentsJob() {
    return jobBuilderFactory.get("importPayments")
        .start(stepBuilderFactory.get("step1")
                .chunk(200)
                .listener(notificationExecutionsListener())
                ...
}
异步处理器
异步处理器可帮助您扩展项目的处理。在异步
处理器用例,则AsyncItemProcessor作为调度器,执行
这ItemProcessor对于新线程上的项目。项目完成后,Future是
传递给AsynchItemWriter待写。
因此,基本上可以通过使用异步项处理来提高性能
允许您实现分叉联接方案。这AsyncItemWriter收集结果并
一旦所有结果都可用,就会写回该块。
以下示例演示如何配置AsyncItemProcessor在 XML 中:
<bean id="processor"
    class="org.springframework.batch.integration.async.AsyncItemProcessor">
  <property name="delegate">
    <bean class="your.ItemProcessor"/>
  </property>
  <property name="taskExecutor">
    <bean class="org.springframework.core.task.SimpleAsyncTaskExecutor"/>
  </property>
</bean>以下示例演示如何配置AsyncItemProcessor在 XML 中:
@Bean
public AsyncItemProcessor processor(ItemProcessor itemProcessor, TaskExecutor taskExecutor) {
    AsyncItemProcessor asyncItemProcessor = new AsyncItemProcessor();
    asyncItemProcessor.setTaskExecutor(taskExecutor);
    asyncItemProcessor.setDelegate(itemProcessor);
    return asyncItemProcessor;
}
这delegate属性是指您的ItemProcessorbean 和taskExecutor属性引用TaskExecutor您选择的。
以下示例显示如何配置AsyncItemWriter在 XML 中:
<bean id="itemWriter"
    class="org.springframework.batch.integration.async.AsyncItemWriter">
  <property name="delegate">
    <bean id="itemWriter" class="your.ItemWriter"/>
  </property>
</bean>以下示例显示如何配置AsyncItemWriter在 Java 中:
@Bean
public AsyncItemWriter writer(ItemWriter itemWriter) {
    AsyncItemWriter asyncItemWriter = new AsyncItemWriter();
    asyncItemWriter.setDelegate(itemWriter);
    return asyncItemWriter;
}
同样,delegate属性是
实际上是对你的ItemWriter豆。
外部化批处理执行
到目前为止讨论的集成方法提出了用例 其中 Spring Integration 像外壳一样包装 Spring Batch。 但是,Spring Batch 也可以在内部使用 Spring Integration。 使用这种方法,Spring Batch 用户可以委托 将项目甚至块处理到外部进程。这 允许您卸载复杂的处理。Spring Batch 集成 为以下内容提供专门支持:
-
远程分块
-
远程分区
远程分块

更进一步,还可以将
使用ChunkMessageChannelItemWriter(由 Spring Batch Integration 提供),它发送项目
并收集结果。发送后,Spring Batch 将继续
读取和分组项目的过程,无需等待结果。
相反,这是ChunkMessageChannelItemWriter收集结果并将它们集成回 Spring Batch 流程中。
使用 Spring Integration,您拥有完整的
控制进程的并发性(例如,通过
使用QueueChannel而不是DirectChannel).此外,通过依靠
Spring Integration 丰富的通道适配器集合(例如
JMS 和 AMQP),您可以将 Batch 作业的块分发到
用于处理的外部系统。
具有要远程分块的步骤的作业可能具有类似于 以下 XML 格式:
<job id="personJob">
  <step id="step1">
    <tasklet>
      <chunk reader="itemReader" writer="itemWriter" commit-interval="200"/>
    </tasklet>
    ...
  </step>
</job>
具有要远程分块的步骤的作业可能具有类似于 在 Java 中遵循:
public Job chunkJob() {
     return jobBuilderFactory.get("personJob")
             .start(stepBuilderFactory.get("step1")
                     .<Person, Person>chunk(200)
                     .reader(itemReader())
                     .writer(itemWriter())
                     .build())
             .build();
 }
这ItemReader要用于读取
经理。这ItemWriter特殊ItemWriter(称为ChunkMessageChannelItemWriter),如上所述。处理器(如果有)被遗漏
Manager 配置,因为它是在辅助角色上配置的。您应该检查任何
实现时的其他组件属性,例如限制等
您的用例。
以下 XML 配置提供了基本的管理器设置:
<bean id="connectionFactory" class="org.apache.activemq.ActiveMQConnectionFactory">
  <property name="brokerURL" value="tcp://localhost:61616"/>
</bean>

<int-jms:outbound-channel-adapter id="jmsRequests" destination-name="requests"/>

<bean id="messagingTemplate"
    class="org.springframework.integration.core.MessagingTemplate">
  <property name="defaultChannel" ref="requests"/>
  <property name="receiveTimeout" value="2000"/>
</bean>

<bean id="itemWriter"
    class="org.springframework.batch.integration.chunk.ChunkMessageChannelItemWriter"
    scope="step">
  <property name="messagingOperations" ref="messagingTemplate"/>
  <property name="replyChannel" ref="replies"/>
</bean>

<int:channel id="replies">
  <int:queue/>
</int:channel>

<int-jms:message-driven-channel-adapter id="jmsReplies"
    destination-name="replies"
    channel="replies"/>
以下 Java 配置提供了基本的管理器设置:
@Bean
public org.apache.activemq.ActiveMQConnectionFactory connectionFactory() {
    ActiveMQConnectionFactory factory = new ActiveMQConnectionFactory();
    factory.setBrokerURL("tcp://localhost:61616");
    return factory;
}

/*
 * Configure outbound flow (requests going to workers)
 */
@Bean
public DirectChannel requests() {
    return new DirectChannel();
}

@Bean
public IntegrationFlow outboundFlow(ActiveMQConnectionFactory connectionFactory) {
    return IntegrationFlows
            .from(requests())
            .handle(Jms.outboundAdapter(connectionFactory).destination("requests"))
            .get();
}

/*
 * Configure inbound flow (replies coming from workers)
 */
@Bean
public QueueChannel replies() {
    return new QueueChannel();
}

@Bean
public IntegrationFlow inboundFlow(ActiveMQConnectionFactory connectionFactory) {
    return IntegrationFlows
            .from(Jms.messageDrivenChannelAdapter(connectionFactory).destination("replies"))
            .channel(replies())
            .get();
}

/*
 * Configure the ChunkMessageChannelItemWriter
 */
@Bean
public ItemWriter<Integer> itemWriter() {
    MessagingTemplate messagingTemplate = new MessagingTemplate();
    messagingTemplate.setDefaultChannel(requests());
    messagingTemplate.setReceiveTimeout(2000);
    ChunkMessageChannelItemWriter<Integer> chunkMessageChannelItemWriter
            = new ChunkMessageChannelItemWriter<>();
    chunkMessageChannelItemWriter.setMessagingOperations(messagingTemplate);
    chunkMessageChannelItemWriter.setReplyChannel(replies());
    return chunkMessageChannelItemWriter;
}
前面的配置为我们提供了许多 bean。我们
使用 ActiveMQ 配置我们的消息传递中间件,并将
Spring Integration 提供的入站/出站 JMS 适配器。如
显示,我们的itemWriterbean,即
我们的作业步骤引用,使用ChunkMessageChannelItemWriter用于在
配置的中间件。
现在我们可以继续工作器配置,如以下示例所示:
以下示例显示了 XML 中的工作程序配置:
<bean id="connectionFactory" class="org.apache.activemq.ActiveMQConnectionFactory">
  <property name="brokerURL" value="tcp://localhost:61616"/>
</bean>

<int:channel id="requests"/>
<int:channel id="replies"/>

<int-jms:message-driven-channel-adapter id="incomingRequests"
    destination-name="requests"
    channel="requests"/>

<int-jms:outbound-channel-adapter id="outgoingReplies"
    destination-name="replies"
    channel="replies">
</int-jms:outbound-channel-adapter>

<int:service-activator id="serviceActivator"
    input-channel="requests"
    output-channel="replies"
    ref="chunkProcessorChunkHandler"
    method="handleChunk"/>

<bean id="chunkProcessorChunkHandler"
    class="org.springframework.batch.integration.chunk.ChunkProcessorChunkHandler">
  <property name="chunkProcessor">
    <bean class="org.springframework.batch.core.step.item.SimpleChunkProcessor">
      <property name="itemWriter">
        <bean class="io.spring.sbi.PersonItemWriter"/>
      </property>
      <property name="itemProcessor">
        <bean class="io.spring.sbi.PersonItemProcessor"/>
      </property>
    </bean>
  </property>
</bean>
以下示例显示了 Java 中的 worker 配置:
@Bean
public org.apache.activemq.ActiveMQConnectionFactory connectionFactory() {
    ActiveMQConnectionFactory factory = new ActiveMQConnectionFactory();
    factory.setBrokerURL("tcp://localhost:61616");
    return factory;
}

/*
 * Configure inbound flow (requests coming from the manager)
 */
@Bean
public DirectChannel requests() {
    return new DirectChannel();
}

@Bean
public IntegrationFlow inboundFlow(ActiveMQConnectionFactory connectionFactory) {
    return IntegrationFlows
            .from(Jms.messageDrivenChannelAdapter(connectionFactory).destination("requests"))
            .channel(requests())
            .get();
}

/*
 * Configure outbound flow (replies going to the manager)
 */
@Bean
public DirectChannel replies() {
    return new DirectChannel();
}

@Bean
public IntegrationFlow outboundFlow(ActiveMQConnectionFactory connectionFactory) {
    return IntegrationFlows
            .from(replies())
            .handle(Jms.outboundAdapter(connectionFactory).destination("replies"))
            .get();
}

/*
 * Configure the ChunkProcessorChunkHandler
 */
@Bean
@ServiceActivator(inputChannel = "requests", outputChannel = "replies")
public ChunkProcessorChunkHandler<Integer> chunkProcessorChunkHandler() {
    ChunkProcessor<Integer> chunkProcessor
            = new SimpleChunkProcessor<>(itemProcessor(), itemWriter());
    ChunkProcessorChunkHandler<Integer> chunkProcessorChunkHandler
            = new ChunkProcessorChunkHandler<>();
    chunkProcessorChunkHandler.setChunkProcessor(chunkProcessor);
    return chunkProcessorChunkHandler;
}
这些配置项中的大多数应该看起来很熟悉
管理器配置。工人不需要访问
春季批次JobRepository也不
到实际的作业配置文件。感兴趣的主要豆子
是chunkProcessorChunkHandler.这chunkProcessor属性ChunkProcessorChunkHandler需要一个
配置SimpleChunkProcessor,您可以在此处提供对ItemWriter(并且,可选地,您的ItemProcessor) 将在工作程序上运行
当它从管理器接收块时。
有关更多信息,请参阅“可伸缩性”一章中有关远程分块的部分。
从 4.1 版本开始,Spring Batch Integration 引入了@EnableBatchIntegration注释,可用于简化远程分块设置。此注释提供
可以在应用程序上下文中自动连接的两个 bean:
-
RemoteChunkingManagerStepBuilderFactory:用于配置管理器步骤 -
RemoteChunkingWorkerBuilder:用于配置远程工作人员集成流
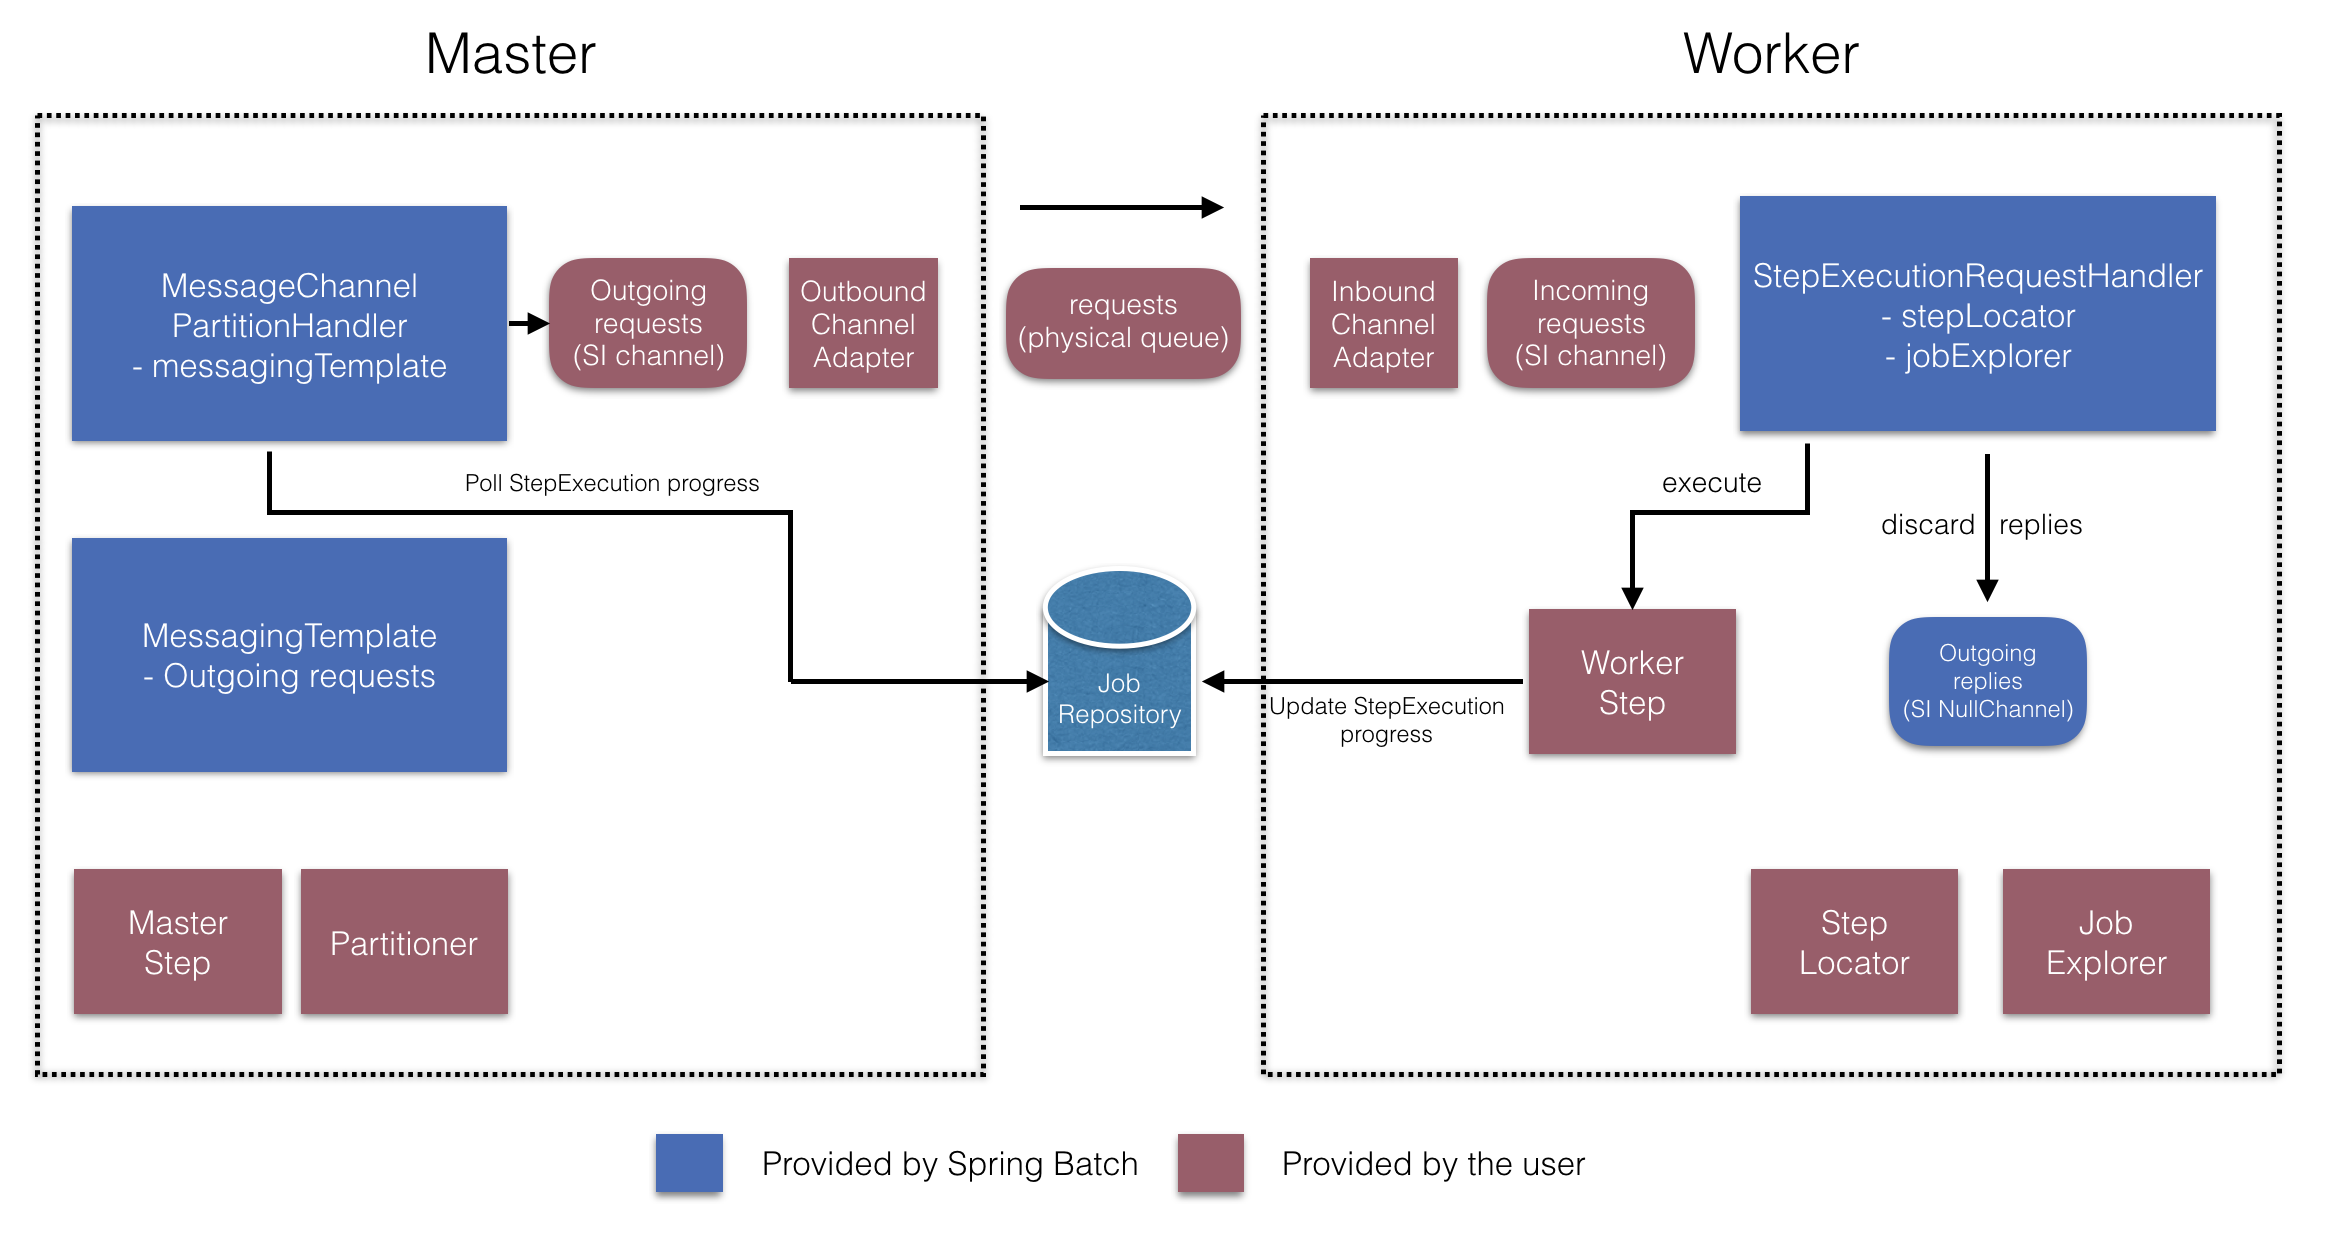
这些 API 负责配置许多组件,如下图所述:

在管理器端,RemoteChunkingManagerStepBuilderFactory让您
通过声明以下内容来配置管理器步骤:
-
用于读取物料并将其发送给工作人员的物料读取器
-
输出通道(“传出请求”),用于向工作线程发送请求
-
用于接收工作人员回复的输入通道(“传入回复”)
一个ChunkMessageChannelItemWriter和MessagingTemplate不需要显式配置
(如果需要,仍可以显式配置这些)。
在工作程序端,RemoteChunkingWorkerBuilder允许您将工作程序配置为:
-
侦听管理器在输入通道上发送的请求(“传入请求”)
-
调用
handleChunk方法ChunkProcessorChunkHandler对于每个请求 与配置的ItemProcessor和ItemWriter -
在输出通道上向管理器发送回复(“传出回复”)。
无需显式配置SimpleChunkProcessor和ChunkProcessorChunkHandler(如果需要,可以显式配置这些)。
以下示例演示如何使用这些 API:
@EnableBatchIntegration
@EnableBatchProcessing
public class RemoteChunkingJobConfiguration {

    @Configuration
    public static class ManagerConfiguration {

        @Autowired
        private RemoteChunkingManagerStepBuilderFactory managerStepBuilderFactory;

        @Bean
        public TaskletStep managerStep() {
            return this.managerStepBuilderFactory.get("managerStep")
                       .chunk(100)
                       .reader(itemReader())
                       .outputChannel(requests()) // requests sent to workers
                       .inputChannel(replies())   // replies received from workers
                       .build();
        }

        // Middleware beans setup omitted

    }

    @Configuration
    public static class WorkerConfiguration {

        @Autowired
        private RemoteChunkingWorkerBuilder workerBuilder;

        @Bean
        public IntegrationFlow workerFlow() {
            return this.workerBuilder
                       .itemProcessor(itemProcessor())
                       .itemWriter(itemWriter())
                       .inputChannel(requests()) // requests received from the manager
                       .outputChannel(replies()) // replies sent to the manager
                       .build();
        }

        // Middleware beans setup omitted

    }

}
您可以在此处找到远程分块作业的完整示例。
远程分区
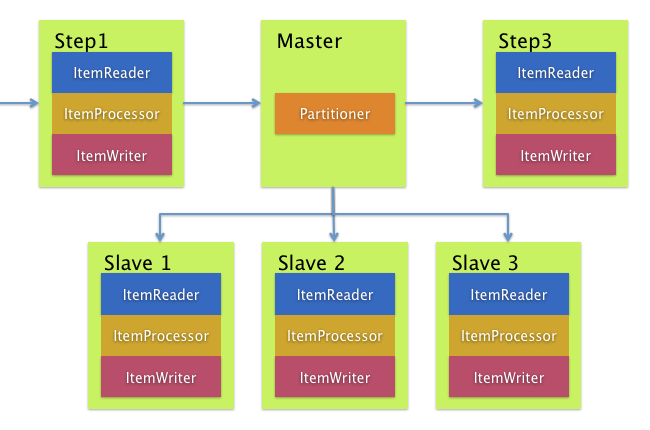
另一方面,远程分区在以下情况下很有用
不是项目的处理,而是关联的 I/O
导致瓶颈。使用远程分区,工作可以
被耕种给执行完整 Spring Batch 的 Worker
步骤。因此,每个工人都有自己的ItemReader,ItemProcessor和ItemWriter.为此,Spring Batch
集成提供了MessageChannelPartitionHandler.
这种实现PartitionHandler接口用途MessageChannelinstances 设置为
向远程工作人员发送指令并接收他们的回复。
这提供了一个很好的传输抽象(例如 JMS
和 AMQP)用于与远程工作人员通信。
“可伸缩性”一章中涉及远程分区的部分概述了概念和
配置远程分区所需的组件,并显示
使用默认值的示例TaskExecutorPartitionHandler分区
在单独的本地执行线程中。用于远程分区
对于多个 JVM,需要两个额外的组件:
-
远程结构或网格环境
-
一个
PartitionHandler支持所需 远程结构或网格环境
与远程分块类似,JMS 可以用作“远程结构”。在这种情况下,使用
一个MessageChannelPartitionHandler实例作为PartitionHandler实现
如前所述。
以下示例假设现有的分区作业,并重点关注MessageChannelPartitionHandler和 XML 中的 JMS 配置:
<bean id="partitionHandler"
   class="org.springframework.batch.integration.partition.MessageChannelPartitionHandler">
  <property name="stepName" value="step1"/>
  <property name="gridSize" value="3"/>
  <property name="replyChannel" ref="outbound-replies"/>
  <property name="messagingOperations">
    <bean class="org.springframework.integration.core.MessagingTemplate">
      <property name="defaultChannel" ref="outbound-requests"/>
      <property name="receiveTimeout" value="100000"/>
    </bean>
  </property>
</bean>

<int:channel id="outbound-requests"/>
<int-jms:outbound-channel-adapter destination="requestsQueue"
    channel="outbound-requests"/>

<int:channel id="inbound-requests"/>
<int-jms:message-driven-channel-adapter destination="requestsQueue"
    channel="inbound-requests"/>

<bean id="stepExecutionRequestHandler"
    class="org.springframework.batch.integration.partition.StepExecutionRequestHandler">
  <property name="jobExplorer" ref="jobExplorer"/>
  <property name="stepLocator" ref="stepLocator"/>
</bean>

<int:service-activator ref="stepExecutionRequestHandler" input-channel="inbound-requests"
    output-channel="outbound-staging"/>

<int:channel id="outbound-staging"/>
<int-jms:outbound-channel-adapter destination="stagingQueue"
    channel="outbound-staging"/>

<int:channel id="inbound-staging"/>
<int-jms:message-driven-channel-adapter destination="stagingQueue"
    channel="inbound-staging"/>

<int:aggregator ref="partitionHandler" input-channel="inbound-staging"
    output-channel="outbound-replies"/>

<int:channel id="outbound-replies">
  <int:queue/>
</int:channel>

<bean id="stepLocator"
class="org.springframework.batch.integration.partition.BeanFactoryStepLocator" />以下示例假设现有的分区作业,并重点关注MessageChannelPartitionHandler和 Java 中的 JMS 配置:
/*
 * Configuration of the manager side
 */
@Bean
public PartitionHandler partitionHandler() {
    MessageChannelPartitionHandler partitionHandler = new MessageChannelPartitionHandler();
    partitionHandler.setStepName("step1");
    partitionHandler.setGridSize(3);
    partitionHandler.setReplyChannel(outboundReplies());
    MessagingTemplate template = new MessagingTemplate();
    template.setDefaultChannel(outboundRequests());
    template.setReceiveTimeout(100000);
    partitionHandler.setMessagingOperations(template);
    return partitionHandler;
}

@Bean
public QueueChannel outboundReplies() {
    return new QueueChannel();
}

@Bean
public DirectChannel outboundRequests() {
    return new DirectChannel();
}

@Bean
public IntegrationFlow outboundJmsRequests() {
    return IntegrationFlows.from("outboundRequests")
            .handle(Jms.outboundGateway(connectionFactory())
                    .requestDestination("requestsQueue"))
            .get();
}

@Bean
@ServiceActivator(inputChannel = "inboundStaging")
public AggregatorFactoryBean partitioningMessageHandler() throws Exception {
    AggregatorFactoryBean aggregatorFactoryBean = new AggregatorFactoryBean();
    aggregatorFactoryBean.setProcessorBean(partitionHandler());
    aggregatorFactoryBean.setOutputChannel(outboundReplies());
    // configure other propeties of the aggregatorFactoryBean
    return aggregatorFactoryBean;
}

@Bean
public DirectChannel inboundStaging() {
    return new DirectChannel();
}

@Bean
public IntegrationFlow inboundJmsStaging() {
    return IntegrationFlows
            .from(Jms.messageDrivenChannelAdapter(connectionFactory())
                    .configureListenerContainer(c -> c.subscriptionDurable(false))
                    .destination("stagingQueue"))
            .channel(inboundStaging())
            .get();
}

/*
 * Configuration of the worker side
 */
@Bean
public StepExecutionRequestHandler stepExecutionRequestHandler() {
    StepExecutionRequestHandler stepExecutionRequestHandler = new StepExecutionRequestHandler();
    stepExecutionRequestHandler.setJobExplorer(jobExplorer);
    stepExecutionRequestHandler.setStepLocator(stepLocator());
    return stepExecutionRequestHandler;
}

@Bean
@ServiceActivator(inputChannel = "inboundRequests", outputChannel = "outboundStaging")
public StepExecutionRequestHandler serviceActivator() throws Exception {
    return stepExecutionRequestHandler();
}

@Bean
public DirectChannel inboundRequests() {
    return new DirectChannel();
}

public IntegrationFlow inboundJmsRequests() {
    return IntegrationFlows
            .from(Jms.messageDrivenChannelAdapter(connectionFactory())
                    .configureListenerContainer(c -> c.subscriptionDurable(false))
                    .destination("requestsQueue"))
            .channel(inboundRequests())
            .get();
}

@Bean
public DirectChannel outboundStaging() {
    return new DirectChannel();
}

@Bean
public IntegrationFlow outboundJmsStaging() {
    return IntegrationFlows.from("outboundStaging")
            .handle(Jms.outboundGateway(connectionFactory())
                    .requestDestination("stagingQueue"))
            .get();
}
您还必须确保分区handler属性映射到partitionHandler豆。
以下示例映射分区handler属性添加到partitionHandler在 XML:
<job id="personJob">
  <step id="step1.manager">
    <partition partitioner="partitioner" handler="partitionHandler"/>
    ...
  </step>
</job>以下示例映射分区handler属性添加到partitionHandler在 Java:
	public Job personJob() {
		return jobBuilderFactory.get("personJob")
				.start(stepBuilderFactory.get("step1.manager")
						.partitioner("step1.worker", partitioner())
						.partitionHandler(partitionHandler())
						.build())
				.build();
	}
您可以在此处找到远程分区作业的完整示例。
这@EnableBatchIntegration可用于简化远程的注释
分区设置。此注解提供了两个对远程分区有用的 bean:
-
RemotePartitioningManagerStepBuilderFactory:用于配置管理器步骤 -
RemotePartitioningWorkerStepBuilderFactory:用于配置工作器步骤
这些 API 负责配置许多组件,如下图所述:
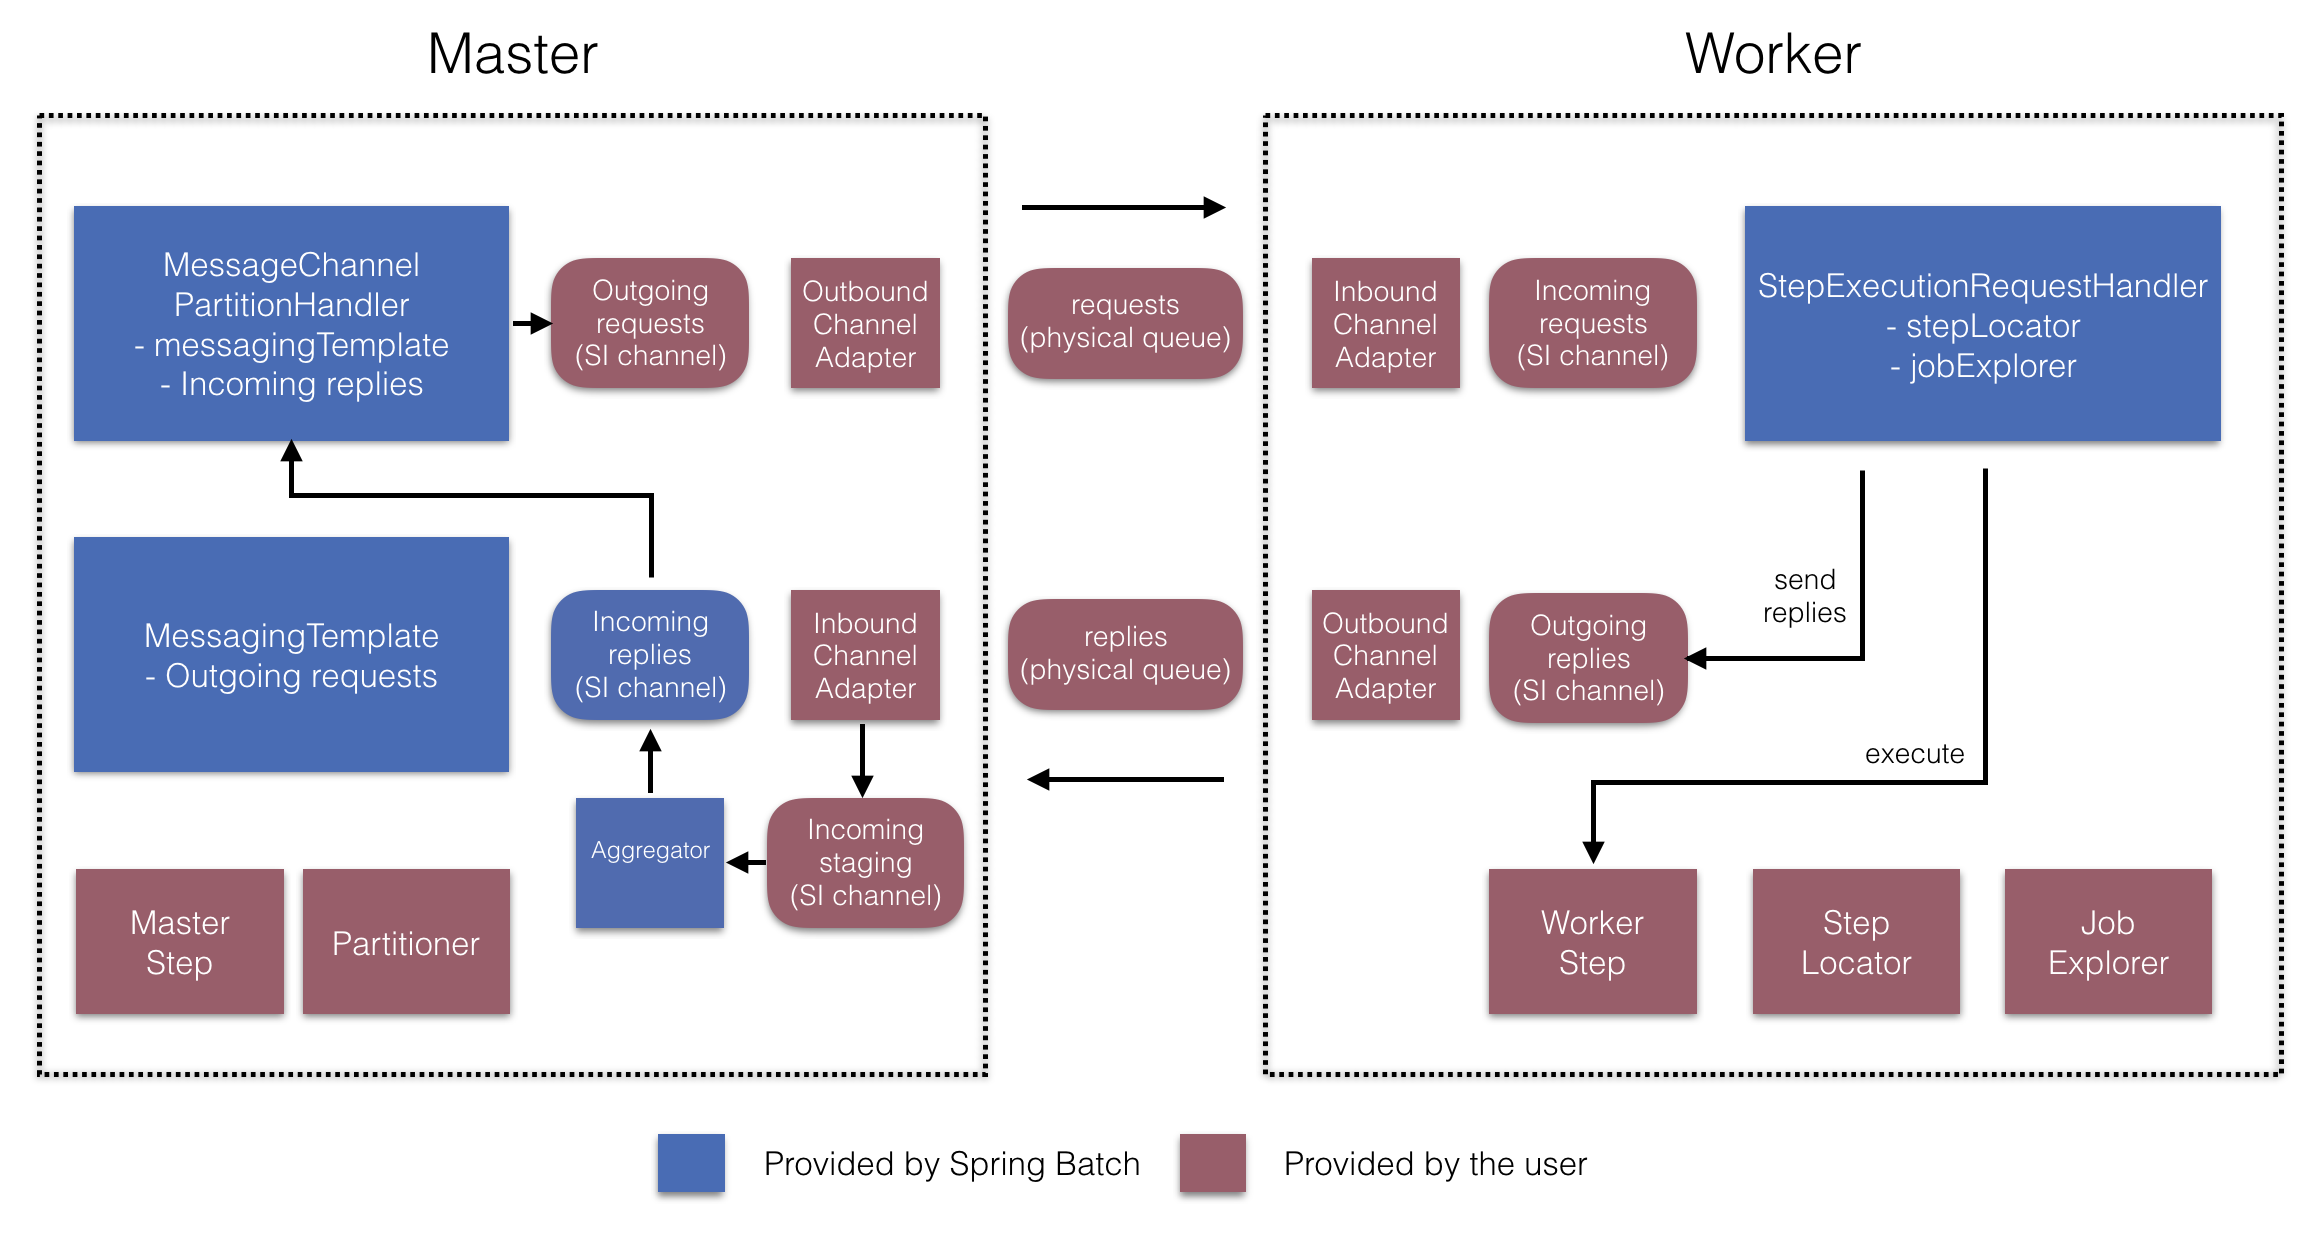
在管理器端,RemotePartitioningManagerStepBuilderFactory允许您
通过声明以下内容来配置管理器步骤:
-
这
Partitioner用于对数据进行分区 -
输出通道(“传出请求”),用于向工作线程发送请求
-
用于接收来自工作人员的回复的输入通道(“传入回复”)(配置回复聚合时)
-
轮询间隔和超时参数(配置作业存储库轮询时)
这MessageChannelPartitionHandler和MessagingTemplate不需要显式配置
(如果需要,仍可以显式配置这些)。
在工作程序端,RemotePartitioningWorkerStepBuilderFactory允许您将工作程序配置为:
-
侦听管理器在输入通道上发送的请求(“传入请求”)
-
调用
handle方法StepExecutionRequestHandler对于每个请求 -
在输出通道上向管理器发送回复(“传出回复”)。
无需显式配置StepExecutionRequestHandler(如果需要,可以显式配置)。
以下示例演示如何使用这些 API:
@Configuration
@EnableBatchProcessing
@EnableBatchIntegration
public class RemotePartitioningJobConfiguration {

    @Configuration
    public static class ManagerConfiguration {

        @Autowired
        private RemotePartitioningManagerStepBuilderFactory managerStepBuilderFactory;

        @Bean
        public Step managerStep() {
                 return this.managerStepBuilderFactory
                    .get("managerStep")
                    .partitioner("workerStep", partitioner())
                    .gridSize(10)
                    .outputChannel(outgoingRequestsToWorkers())
                    .inputChannel(incomingRepliesFromWorkers())
                    .build();
        }

        // Middleware beans setup omitted

    }

    @Configuration
    public static class WorkerConfiguration {

        @Autowired
        private RemotePartitioningWorkerStepBuilderFactory workerStepBuilderFactory;

        @Bean
        public Step workerStep() {
                 return this.workerStepBuilderFactory
                    .get("workerStep")
                    .inputChannel(incomingRequestsFromManager())
                    .outputChannel(outgoingRepliesToManager())
                    .chunk(100)
                    .reader(itemReader())
                    .processor(itemProcessor())
                    .writer(itemWriter())
                    .build();
        }

        // Middleware beans setup omitted

    }

}